How To Braid Hair From Top Of Head will be the topic of our conversation on this particular occasion. There is, without a doubt, a great deal of information pertaining to Swedish Crown Braid – Hair Tutorial available on the internet. As a result of the rapid development of social media, it is now much simpler for us to acquire new information.
There is a connection between the pieces of information pertaining to Braid Hair - Deutsch, how to braid hair across top of head, and How To Dutch Braid Your Own Hair. Regarding the other items that need to be searched, one of those things is concerning Dutch Crown Braid, which will also have something to do with How to French Braid Hair.

41 Reference List: How To Braid Hair From Top Of Head | How to French Braid Your Own Hair | Step-by-Step Guide
- We’ll never get bored with braids. And for good reason – not only do they look good, but they’re totally versatile and can add a bit of flare to almost any beauty look (just ask Blake Lively and Emily Blunt!). From cornrows to box braids, side braids, half-up half-down braids, the fancy waterfall braid and so many more, there’s a braided hairstyle out there to suit every hair type. - Source: Internet
- A big thank you to my aunt who helped me with this hair tutorial. I’m very lucky that four of my aunts are hair stylists. =) - Source: Internet
- From the top center of your head, take a large chunk of hair and separate it into three fairly even sections as you would a regular braid. Start by making a few rows of a regular braid. - Source: Internet
- Wrap your nubby, woolly, warm scarves around your neck. But don’t neglect the pretty, silky, light scarves lying around in your dresser. They have a place, too: in your hair! Trust me. While I was writing about (and testing, step by step) all the styles in our new Allure Hair: The Ultimate How-to Hair Guide issue, I discovered three great ways to get the most out of your scarves. Go grab one that’s long and narrow—when you fold it in half, the two sides should be longer than your hair—and let’s get tying. - Source: Internet
- You’re probably familiar with standard braids, but here’s a refresher if needed. Start by crossing one of the outer pieces of hair over the middle piece. Then cross the other outer piece over the middle piece. - Source: Internet
- Draw a center part all the way to the nape of your neck and divide the hair in half. Line up the center of your scarf against the nape and drape each end on top of a section of hair. Now you’re going to braid the scarf into the hair: Separate each chunk of hair into three pieces—two hair, one scarf—and braid the first side; secure with an elastic and repeat on the other side until you have pigtail braids. Pull the two braids to the top of your head and tie the ends of the scarf in a knot. Now you’re ready for a cozy day in a Parisian cafe—or Barnes and Noble. - Source: Internet
- Step 2: Use your fingers (or a comb) to create a ‘V’ shape from your temples to your crown. Take three pieces of hair from that section and begin braiding them, repeating this mantra: left side over middle, right side over middle. Each time you repeat this motion, you also need to add a small section of hair from either side. - Source: Internet
- Another quick tip: Use a strong hold finishing spray. “This is key when braiding with layers,” says Metz, who recommends applying it liberally after the braid is complete." - Source: Internet
- Fishtail braid (also known as Grecian braid): Divide the hair into two pieces instead of three. There is no middle piece here. Just cross the pieces over each other while incorporating sections of hair from the front. - Source: Internet
- But truth is, braiding hair is no easy feat. And while we can watch a bazillion braiding tutorials on YouTube, it’s always waaay harder trying to do it IRL. Anyone else wishing they had learned how to braid hair back when they were kids?! - Source: Internet
- Keep holding all three pieces of hair. Now, take the outer piece (from the side that you crossed over first, not the most recent side) and add a small section of hair from the front of your head on that side. Smooth it out as well as you can to avoid bumps and ridges. - Source: Internet
- You’ll need about 2 inches at a minimum for this to work. If you wish to make two braids, part your hair cleanly in the center (from forehead to nape). Pull one side of your hair into a loose ponytail or alligator clip. Braid the other side as directed, then release the clipped hair and repeat on that side. - Source: Internet
- I’m so excited to share with you my first hair tutorial. I mentioned at the first of the year that I was going to begin beauty posts in 2014 because it’s one of the most requested topics I get. I respond to many questions via tweets, comments, emails, etc. about my hair care process and styles which has led me to today. - Source: Internet
- You can make the braid as tight or as loose as you want. However, remember that tight braids are harder on the hair, leading to stress and breakage. Conversely, loose braids don’t last as long, and can look messy (although sometimes “messy” is a style). - Source: Internet
- ‘It’s about keeping it modern and not too straight and perfect,’ says Appleton. ‘A dutch braid always looks more fashion when it’s messier, otherwise it can look a little dressage.’ - Source: Internet
- This part makes a braid a “French” braid and not just a standard braid. Every time you cross an outer piece of hair over the middle piece, you’ll incorporate a little extra hair. Your braid will get thicker as you move down your head, and by the time you’re done, all hair will be in the braid. - Source: Internet
- As with most hairstyles, you’ll want to start with clean, dry hair. Wash and condition your hair as you normally do. Shampoo ingredients to avoid include: - Source: Internet
- Dry your hair thoroughly. You can use a microfiber towel or a blow dryer on the coolest setting. You’ll want to make sure that your hair is completely dry before you start braiding. Wet hair is heavier and harder to braid. Your braids will also last longer and frizz less if you start with dry hair. - Source: Internet
- There’s something undeniably alluring about the classic French braid. With a few twists of the wrists you’re suddenly twinning with the likes of Disney princesses like Rapunzel and Belle. But the style isn’t as effortless as it looks, especially if you’re trying to French braid your own hair. - Source: Internet
- As you braid down your head, the number of hair that’s hanging by your neck will diminish and be incorporated into the rest of the braid. By the time you reach the nape of your neck, you shouldn’t have any extra hair left over, so you’ll basically just be continuing a regular braid. Easy! - Source: Internet
- Multiple braids, like pigtails, may sound like a big jump in technical ability, but it’s really quite simple once you know what you’re doing. You simply divide hair into two sides—one on each side of your hair, then follow the steps above, one side at a time. To ensure hair from the other side doesn’t get in your way when braiding, secure each section with a tie or clip, says Metz. - Source: Internet
- Now go back to the first side, add another section of hair from the front of your head to the working piece, and cross it over the middle again. Repeat again on the other side. Continue braiding this way until all of your hair is in the braid. Then continue braiding the standard way until all of your hair is braided. - Source: Internet
- Four-strand braid: Divide your hair into four sections instead of three. Bring the outer section over the second section and under the third. Then bring the other outer section over the third section and under the second. Repeat while incorporating sections of hair from the front of the head. - Source: Internet
- Use your hands to smooth down the side of your head to minimize bumps or ridges. If your hair feels frizzy or there are still stragglers, you can apply some product to keep it neat. Spritz your braid with hairspray or your favorite styling spray. - Source: Internet
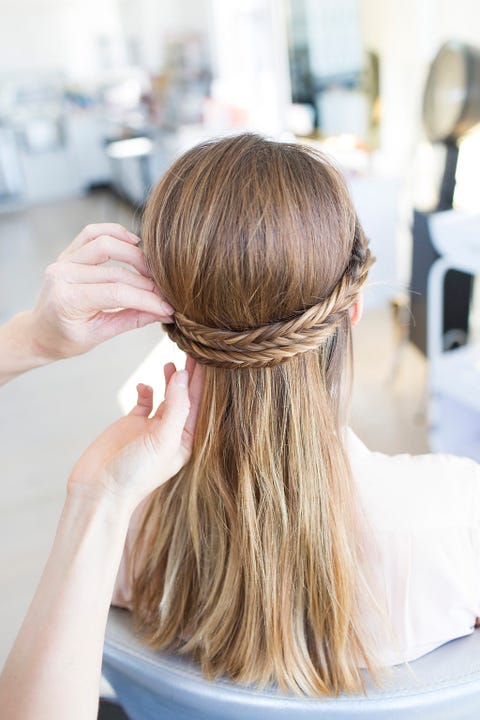
- For a great look at any time of the year, Crown Braids are where it’s at. Whether you’re looking for a subtle look or something a bit more whimsical, the variety of their appearances and multiple braids to choose from are endless. A crown braid, in our opinion, is your best headband. It adds great texture to your updo that can be seen from all angles. - Source: Internet
- Another option is to secure the braid at the nape of your neck and make a ponytail. This would look beautiful in long hair. You could even curl the ponytail for a more formal style. - Source: Internet
- “Wet hair is more fragile than dry,” she explains. “So starting with dry hair will help avoid breakage.” Plus, it’s easier to separate dry strands, reducing the chance you’ll end up with all kinds of lumps and bumps throughout. - Source: Internet
- When you’ve reached the end of your braid, secure the ends with a covered elastic hair tie. You can use one that matches your hair color for a discreet, elegant look, or you can pick something bright and fun. If you’re careful, your braid can last a day or two, so you can even switch it up for a different feel. - Source: Internet
- If you’re wondering how to French braid your own hair, you’re in luck. We get asked how to do this on a regular basis, so we made a guide to walk you through the process. Read on to learn all you need to know. - Source: Internet
- Cross that outer piece, including both the original hair and the new addition, over the middle piece, just as you did before. Repeat the process with the outer piece on the other side. You’ll now add a small section of hair from the front of your head on the other side and cross that outer piece over the middle. - Source: Internet
- If you have thin or fine hair, you may want to apply a small amount of your favorite texturizing product or even a very light spritz of dry shampoo. This helps reduce flyaways when you’re braiding it. If your hair is thick, coarse, or curly, you can use a little leave-in conditioner to make it manageable. - Source: Internet
- Dutch braid (also known as inverted French braid): Instead of crossing the outer pieces over the middle, you cross them under. This raises your braid and makes it more prominent. It can look very striking if you want to experiment with temporary color or glitter. - Source: Internet
- Start at the top of your head and in the center of your hair. Section off a small segment as cleanly as possible. Use your fingers to divide that segment into three equal pieces (again, as cleanly as possible). - Source: Internet
- Step 9 – Repeat this process over and over. Add a small section to the bottom and to the top sections of the braid. Then pass the bottom section under the middle section, then the top section under the middle section. - Source: Internet
- (As a side note, we actually recommend forgoing the mirror when you French braid. Given that it’s, well, a mirror, it tends to be more confusing than helpful, especially when you’re first starting out.) - Source: Internet
- Since it’s difficult to see what your hands are doing behind your head, things can easily get, quite literally, tangled up back there. The good news: You don’t have to enlist the help of a talented friend or roommate to achieve the style. With this stylist-approved easy step-by-step guide, even complete beginners will master the art of French braiding, whether a single strand or pigtails, in no time. You may even be able to dip your toe in some advanced techniques, like adding ribbons or trying your hand at the Dutch braid (essentially an inside-out French braid). - Source: Internet
- So things are going well… until those pesky layers start sticking out from every direction? If you have short layers, Metz suggests curling the end of your layers before you start the braiding process. “If the ends of your hair are stick straight, they will be more likely to poke out,” she explains. “Curling the ends makes it easier to tuck those rogue sections in and melt into the overall look of the braid.” - Source: Internet
- It’s summer, and we’re getting sweaty; what better way to keep our hair out of our (uh, extremely radiant faces) than with a French braid? But creating a French braid on your own head may seem like the most daunting task of all time, mostly because it looks super complicated. Best news ever: It’s almost crazy how simple it is. We’ve managed to narrow the entire process down to just four easy steps. Without further ado, here’s exactly how to French braid your own hair. - Source: Internet
- Recently I went to a beautiful beach wedding and my friend Sam asked if I could do her hair. She said there would be champagne and I was there in a flash. I braided my hair in a half-up half-out style and I shot a tutorial while I was getting ready. - Source: Internet
- Go messy: “One of my favorite French braid variations is to lightly pull out the sides of each section all the way down the braid,” says Metz. “This creates a really full-looking braid that’s more relaxed, but makes a statement.” - Source: Internet
- Comb your hair with a fine-tooth comb to remove all tangles. It should be as sleek and smooth as possible when you start braiding. This will make your braid neater and more even. - Source: Internet
 To get you started, here are some pointers to consider when searching for information regarding How To Braid Your Own Hair:
- Do some research to find Dutch Braid-related information from reputable sources. This may include professional journalists, as well as online libraries and other websites.
- When looking for information regarding French Braid, it is crucial to be aware of the various types of sources that can be found through electronic media. Some examples of these types of sites include Google and YouTube. There is also the possibility of obtaining information about Easy Crown Dutch Braid Tutorial On Medium Hair from various social media sites, such as Facebook and Twitter. This is another another potential source.
To get you started, here are some pointers to consider when searching for information regarding How To Braid Your Own Hair:
- Do some research to find Dutch Braid-related information from reputable sources. This may include professional journalists, as well as online libraries and other websites.
- When looking for information regarding French Braid, it is crucial to be aware of the various types of sources that can be found through electronic media. Some examples of these types of sites include Google and YouTube. There is also the possibility of obtaining information about Easy Crown Dutch Braid Tutorial On Medium Hair from various social media sites, such as Facebook and Twitter. This is another another potential source.Video | How To Braid Hair From Top Of Head
Reading and doing research on the authenticity of each source are both essential if you want to discover the greatest information there is about French Braid Over The Top. Your understanding of How To Braid Your Own Hair will be improved by watching the many videos on Swedish Crown Braid – Hair Tutorial that are included in this page. These films come from a variety of different sources. Finding knowledge on a wide range of subjects is made much simpler by making use of the internet as a resource.
## Here are some crucial points concerning Halo Braid Tutorial:- How To Braid Hair From Top Of Head
- How To Braid Hair Over Top Of Head
- How To Plait Hair From Top Of Head
- How To Braid Hair Across Top Of Head
- How To Braid Hair From The Top Of Your Head
You won’t have any trouble finding the information you’re looking for because there are so many websites and forums on the subject of Twisting Braid Hairstyle Tutorial.
When it comes to obtaining information on Halo Braid Tutorial, the majority of individuals are more accustomed to using a different route. It enables a more in-depth look at the information regarding French Braid Short Hair’s content and how it may be used, which is really helpful.

strategies to design information displays that are both aesthetically pleasing and functional that pertain to Crown Braid: Anleitung. They are useful in commercial and marketing settings, and they can also be put to use to convey information on How To: Braid a Heidi hair headband across the top of head. As a result, we also supply some photos pertaining to Dutch Braid.
In summary, this article offers a comprehensive analysis of 35 Cool Braids That Are Actually Easy (We Swear). In addition, Little Braids On Top Of Head and Little Braids On Top Of Head are mentioned here as a comparison of your knowledge regarding Dutch Crown Braid.
